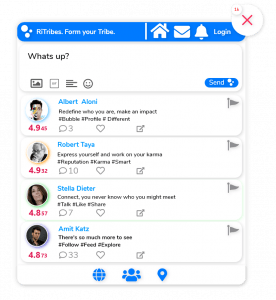
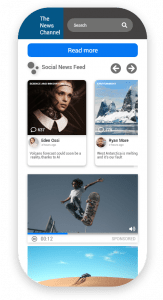
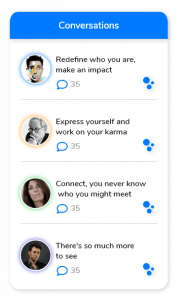
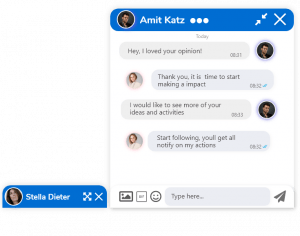
Engagement that people love

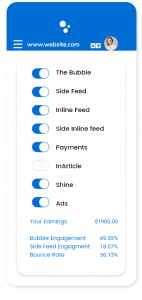
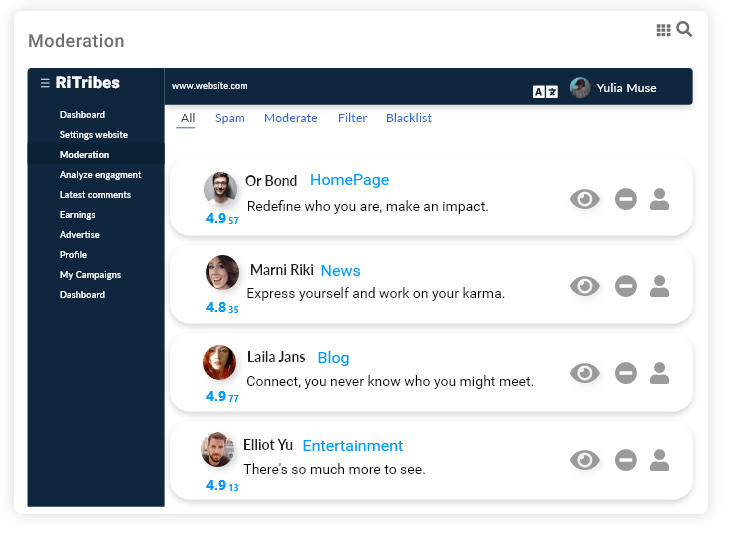
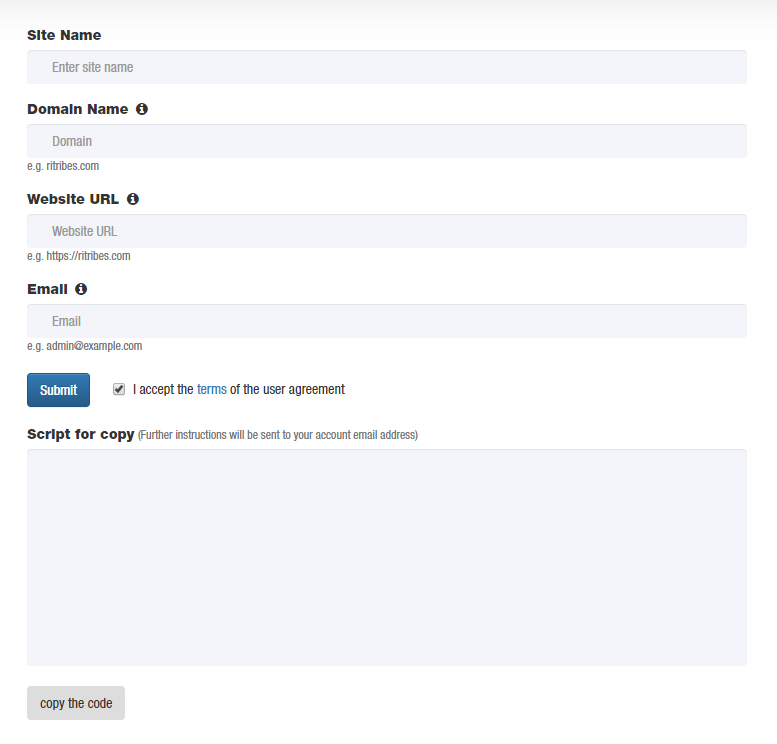
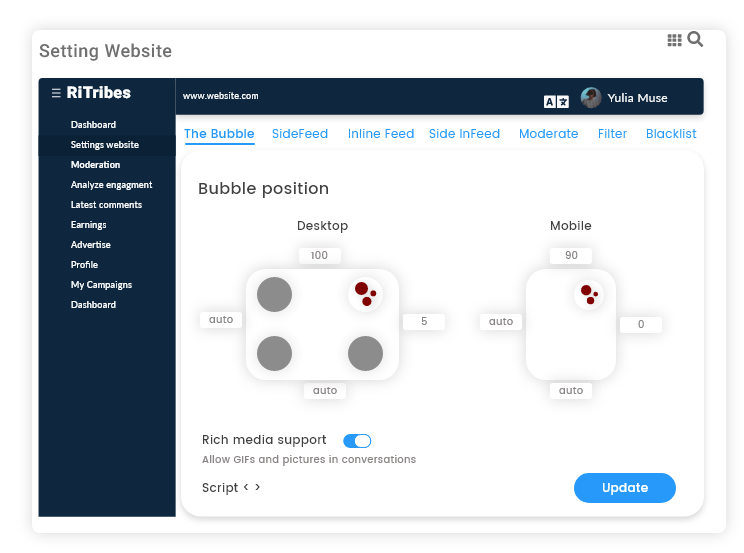
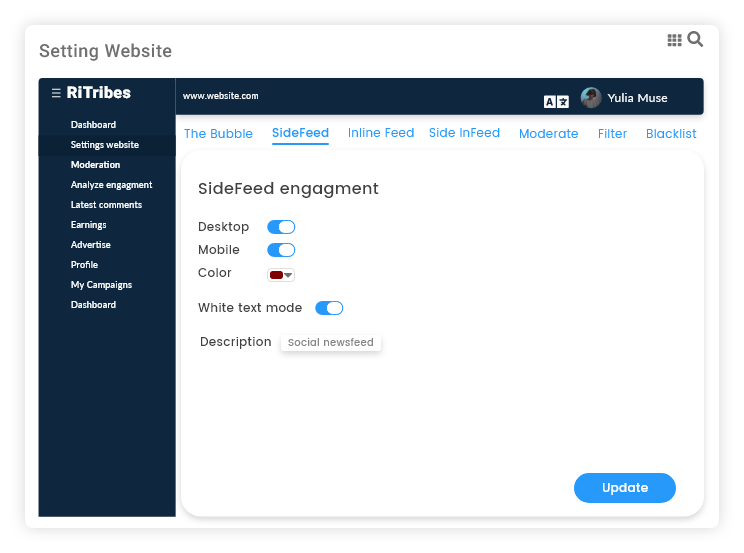
Helps your brand build a loyal community that engages with your content using our engagement solutions. Our solutions include The Bubble, the pioneering social assistance, content feed in various modules, real-time conversations, private messages and live blogging tools. These tools have an intuitive user interface as well as robust social features that keep users on your site , all supported by smart moderation.

  • Design. Automatically adapts to your sites design and colors, or you can design it to your own liking.
  • Works everywhere. Supports devices from desktop to mobile.
  • Multi language support. 4 languages supported and counting.

Not looking to switch out your existing commenting, live blogging or live chat features? RiTribes  platform integrates with your site without limiting any other solutions.

Watch ads outside the box

Earn money with native ads. The first ad service that actually provides insights and live results.

  • Flexible options. Native ad units are placed in your site. Pick the type of ad most suited to your site. You’re in complete control.
  • Adapts to your page. RiTribes ads are responsive — they adapt to the look of your site and change layout based on device and width.
  • Revenue analytics. Understand how your website’s traffic and audience engagement affect the revenue you’re making.

When you’re ready to advertise, RiTribes Ads estimates the results you’ll wind up getting, based on any budget amount you choose. And it does it in real time, so you can make an informed decision about how effective is your Ad.

Analyze your site and understand your audience

Every word, photo, video, and influencer can have an impact. RiTribes analytics help you understand how the content shared on your site and grows your business.High-level statistics tracked from month to month.

  • RiTribes analytics. Get a deeper understanding of your audience. RiTribes Analytics gives you the tools you need at no cost to analyze data for your business in one place..
  • Social insights. Access RiTribes unique insights and machine learning capabilities to help get the most out of your data and connect your insights to results.
  • Advertisers dashboard. You can track your impressions, results, and cost-per-result across all your different campaign objectives.

All the right tools for your website, are you ready for improvement?

Moderation that works smarter. Together.

RiTribes smart moderation system will ensure that discussions around your content remain civil and are in accordance with community guidelines. By creating a comfortable environment for individuals to return to, passive viewers will convert to be loyal members of your community, boosting return visits, time spent on-site and page views.

The automated moderation system goes beyond just simple word filtering: it can detect highly complex expressions and filter out roughly 85-90% of content that doesn’t adhere to your community guidelines. The additional 10-15% of questionable comments can be reviewed by your moderators, or you can leverage our moderation team, which operates 24/7.

With RiTribes, you own your community.

In this section, you will find everything you need to get started with the best engagement solution we have to offer.

All of RiTribes audience engagement and analytics tools are powered by a single lightweight JavaScript , so the only thing you need to do is integrate our script into the pages of your site.

Supported platforms

RiTribes can be installed on  any website using the basic universal JavaScript embed code. The following section is meant for developers only. RiTribes  also supports dozens of popular blogging and website platforms such as WordPress, and more.

Before you start
  • Make sure you’ve registered your website with RiTribes. Go to  Get Started Guide for registering.
  • You will need to be able to edit the HTML of the website you are installing RiTribes on.
  • To install RiTribes, you will need to know your Site Name as used in the registration form.
Join RiTribes publishers community.

Before going any further, you will need to register your website with RiTribes. You will also need to create a user profile in order to login and administer this website. During registration a site ID is automatically created, which is how we identity and contain your site information and settings.

Note

If you are not an admin of any site or you are currently logged out of RiTribes, you will not be able to access the Dashboard Manager. Below is how you can apply to RiTribes for publishers, if you’d like

Site name

Your Site Name is the name that is displayed publicly on various places across RiTribes on your site. It’s main purpose is to serve as the title for your RiTribes Newsfeed. We recommend that you simply use your website’s name.

Domain Name

Your site domain, where you want RiTribes to be embedded. You should enter your site’s central domain here.

Website URL

We currently support port 80 for HTTP, and 443 for HTTPS. This ensures your site is accessible from one of these two ports before installing RiTribes.

Email

This account will be used to access your admin dashboard, you can control your site engagement tools, analytics, moderation and your team.

Note

Now that your RiTribes Services ID is registered, we need to verify you own the provided domain. If the domain is not verified, the service will not function.

Install RiTribes

RiTribes is compatible with many popular websites platforms, content management systems, and custom websites. Example of WordPress platform  is specified.

This allows users to connect on your site using the Bubble. This tool also includes user profiles, login and logout functionality, user News feed and follow feature.

Script Example

<!DOCTYPE html>
<html>
<body>
...
<script>
var script = document.createElement('script');
window.identifier = ''; //optional -> insert identifier variable for your unique page's
script.id = 'embed-script';
window.ritribesID = '<website-id>';
script.setAttribute('position','top-right');
script.src = '//app.ritribes.com/embed/inject/embed.js';
script.setAttribute('data-timestamp', +new Date());
(document.head || document.body).appendChild(script);
</script>
</body>
</html>

Recommendation

To ensure that your audience engagement data is correct and complete, we highly recommend loading the RiTribes script on every page of your site.

Window identifier

RiTribes uses window identifier in order to logically organize content on pages. Put plainly, window identifier are used to tie conversations and content curated by your audience to your web pages, such as a community conversation attached to a sports page, or a conversation thread attached to a news article.

Typically your CMS, or database will have a persistent unique identifier associated with each piece of content or article you publish. This can directly be used as the page identifier for the RiTribes engagement tools.

You can define your window identifier  in your HTML page.

Window identifier script

<script>
....
window.identifier = ''; //optional -> insert identifier variable for your unique page's 
....
</script>

Important

Please make sure that you have an up-to-date backup  as this is a change that affects the entire system and any incorrect handling may influence the site.

WordPress

Follow this instruction If you have a WordPress site and you the basic knowledge for working with it.
If not please visit WordPress Where to Start

Login to WordPress Dashboard go to “Appearance” to “Editor” or “Theme Editor”, locate “footer.php” file under the files menu.
Insert the script within “footer.php” above the tag </body>

Once completed, please update WordPress site. example below:

WordPress script example

<footer>
...
<script>
var script = document.createElement('script');
window.identifier = ''; //optional -> insert identifier variable for your unique page's
script.id = 'embed-script';
window.ritribesID = '<website-id>';
script.setAttribute('position','top-right');
script.src = '//app.ritribes.com/embed/inject/embed.js';
script.setAttribute('data-timestamp', +new Date());
(document.head || document.body).appendChild(script);
</script>
</body>

Important

Please make sure that you have an up-to-date backup  as this is a change that affects the entire system and any incorrect handling may influence the site.

Refresh the page

Refresh the page and you should see the Bubble you have implemented on the page, default location is top left.

Click here for more information about the Bubble settings.

The pioneering intelligent social assistant

The RiTribes Bubble allows publishers to implement real-time, civil and highly engaging social experience on their sites. Generate excitement and bring your community together for major events by creating dedicated live conversation widget. The social widget takes full advantage of  Ritribes automated moderation to meet the high demands of the rapid-fire nature of Live commenting platforms — eliminating evil creatures when attempting to harass other users online. The Bubble can fit anywhere on your site, so it may be easily displayed on free space.

Position The Bubble

We want the Bubble to fit to your site and integrate seamlessly so you have the option to place it where you want it to be.

our recommendation is using the default setting “top-right”, and we’ve set 4 location for you to choose or modify the values for your website.

  1. Login to your manager account.
  2. In your Manager Dashboard, click Setting Website, then click The Bubble. .
  3. Click the position you want The Bubble to be or match it to your website by changing the positioning values.
  4. Click Update to store your configuration.

Script Example

<!DOCTYPE html>
<html>
<body>
...
<script>
var script = document.createElement('script');
window.identifier = ''; //optional -> insert identifier variable for your unique page's
script.id = 'embed-script';
window.ritribesID = '<website-id>';
script.setAttribute('position','top-right');
script.src = '//app.ritribes.com/embed/inject/embed.js';
script.setAttribute('data-timestamp', +new Date());
(document.head || document.body).appendChild(script);
</script>
</body>
</html>
Rich Media support

Enable or disable rich media formats, this enables your users to add pictures, GIFs , add some color to the conversation.

Enabled by default.

Bootstrap buttons

Attract more website engagement, website’s layout is essential in helping users to easily navigate through it. But paying attention to your website’s elements are also important, especially buttons. Bootstrap buttons are another way your site and users can interact with each other. Buttons can have different roles, such as commenting, login, sharing and even social networks. It is the doorway to another page, transaction or message. So making your website’s buttons attractive and appealing will add more attention to the whole page, below are Tribes Bootstrap buttons that you can use for your website.

Comment button and counter

Increase visibility and audience engagement by giving the additional clickable buttons.

Commenting button can be attached to any design that is part of your website using  RiTribes comment button ID:

<button type="button" class="ritribes-comment-embed-btn">

Adding the amount of comments increases interests and encourage the visitor to open the commenting section to view contented curated by loyal active audience.

We support all types objects including div/a/i and more. Add comments counter to a page, div example:

<div class="ritribes-comment-embed-count">


Best practice is to combine both of the functions above and displaying them as one, for example:


Important

Please make sure that you have an up-to-date backup  as this is a change that affects the entire system and any incorrect handling may influence the site.

Login button

Encourage users to join your Tribe. embed login button directly on your site.

Engaging with login button will open the Bubble to various signup options. RiTribes login button CLASS:

<button type="button" class="ritribes-login-btn">


Using a flat image – save image below and by using unique ID within  the HTML Tag the image will become a button.

Example:

<img src="Your image path on the server" style="width:28px; height:28px; id="ritribes-login-btn">


Example provided is 28 pixel in dimensions “button” defined by the “style” parameters in the code, you can use your own design to match your site, keeping the ratio image 1:1 is required.

Creating a button using CSS code

1. Place the button in the desired location and  insert below HTML tag:

<a class="ritribes-btn" id="ritribes-login-btn"></a>>

2. Copy the CSS code below and add it to your style CSS page:

CSS Script

.renteres-btn {
display: inline-block;
text-align: center;
vertical-align: middle;
padding: 10px 10px;
border: 1px solid #a99c99;
border-radius: 8px;
background: #f1dfda;
background: -webkit-gradient(linear, left top, left bottom, from(##f1dfda), to(#a99c99));
background: -moz-linear-gradient(top, #f1dfda, #a99c99);
background: linear-gradient(to bottom, #f1dfda, #a99c99);
-webkit-box-shadow: #dedede 1px 1px 40px 1px;
-moz-box-shadow: #dedede 1px 1px 40px 1px;
box-shadow: #dedede 1px 1px 40px 1px;
text-shadow: #ffffff 1px 1px 1px;
font: normal normal bold 5px arial;
color: #111111;
text-decoration: none;
}
.renteres-btn:hover,
.renteres-btn:focus {
border: 1px solid #f1dfda;
background: #ffffff;
background: -webkit-gradient(linear, left top, left bottom, from(#ffffff), to(#cbbbb8));
background: -moz-linear-gradient(top, #ffffff, #cbbbb8);
background: linear-gradient(to bottom, #ffffff, #cbbbb8);
color: #111111;
text-decoration: none;
}
.renteres-btn:active {
background: #a99c99;
background: -webkit-gradient(linear, left top, left bottom, from(#a99c99), to(#a99c99));
background: -moz-linear-gradient(top, #a99c99, #a99c99);
background: linear-gradient(to bottom, #a99c99, #a99c99);
}
.renteres-btn:after{
content: "\0000a0";
display: inline-block;
height: 24px;
width: 24px;
line-height: 24px;
margin: 0 -4px -6px 4px;
position: relative;
top: -3px;
left: -4px;
background: url('data:image/png;base64,iVBORw0KGgoAAAANSUhEUgAAAEAAAABACAYAAACqaXHeAAAAGXRFWHRTb2Z0d2FyZQBBZG9iZSBJbWFnZVJlYWR5ccllPAAAA1BJREFUeNrsm+1x4jAQhg2TAijBN8f/mAriVBBTQaCChApIKghUYFIBpgJ8FYT8TyaU4A5yu3evc0LHh2RLIBztjMZgJFl6tLta28tFYEHeu92QDndUIioxlTWVFZXpz7e3PHBIWhYmP6BDuqdKRmVIIAoXAFwcefIsCY79RmkATb5Dhw8qHcUmrAWzJmnAQGPyLLdUZgeARsKplQ2zMQngSrN+vGfiTwAq/8bAHgnE2tSg2wYBdAyZ0cu2yQta9kL1IhcBmJAllVAB9Byw7JgAOmfaN4Kq8v69YLu1YYvYQVRXNsT4JsY1AOr1ATuMJZt9Mq2CNXzIjXETQAS3PGDPf+qYUkGpXx2JbPiAVNGZlZ76lNIxCgCrH+vs+xa04KSBUFihfQTn6JxIgVRBjntl/V7AkYmHMM9EOl/gbvTB5Tig7uQjBFLJDp8xpjobDrzdsJU/tIOV2/m4iRow1tgZ7gGsUQCSKvWbBEB3S75snBOsEnl+ZwCBB+ABeAAegAfgAXgAHoAH4AF4AB6AB+ABeAAegAfgAXgA30oKGcC6QidRjfZ1s0y+rvfe7SYV2i82ACDzaqg5sDvh8y/NAeTS9zrtbzXbTsocxTYIxpyjg5O9QP2Vd0jtHgBwpqkFU+n7THMSz8LqJxpac01jHck+gFcypc5S1gQq11xRcVD8xjXG576iBk3kpGlo4EhjBXO830sVtYUzU3/I122BIr9VLSexkcyMV8lMuMwY6+wg2+M2eEU9D7YnXHCfnOi4M7sLGjU+MPnRlnHLksGssn2JlSUApjiQBjrFxQppgBGc36XkBIfihZD2VtYpVAYjtA2Df+n2IuRncQWp3lxYEP79NfibUqtqwl8AdlEvQHJBnWZN3AtLAKxGS4X6pVqtAkvJyycBAAifFYOJFY6vUMP1OcFpSfaUGO4/BxCjGd62QuGFhf7jwEKGty0AmYHwdJe4kFm6HwBsdmrxWnHFmP2od4MTi1pQJWY/LgBowaPF6yWu5Rf/9zwAYWpu0xTO4YFIH07Rhji1G7QUYvJQWLUrePQ6k8hxt+mE7M0WR/Cy3mYSApwIUEzAcQtATTgRbqEHZxEK2xJEgKmgGU6ZgPWnwvxPDSo9YXt16p7gtwADAJ0MMQbgqvfXAAAAAElFTkSuQmCC') no-repeat left center transparent;
background-size: 100% 100%;
}

You can change the style to fit to your site design , please make sure that the  Tag of  Base64 RiTribes image remains with no changes.

SideFeed overview

SideFeed provides your web social content in a side windows, and implements browser features such as following links when clicked by the user, managing a back-forward list, and managing a history of pages recently visited.

Simplifies the process of displaying social content which increases user interaction and interest, a frame element with its own set of scroll bar.


  1. Login to your manager account.
  2. Navigate to ‘Website settings’ and then ‘SideFeed’ .You’ll be taken to SideFeed engagement.
  3. Click the enable on button to activate SideFeed.
  4. Select your color
  5. Select your text color to be black or white.
  6. Click Update to store your configuration.

Desktop

Enables SideFeed across desktop devices

Mobile

Enables SideFeed across mobile devices

Color

Changes the color appearance, match to your site design.

White text mode

Changes the text color from black to white, match it to your color.

Update

Don’t forget to update, to apply changes made.

Enhance Your Website With Inline Feed and ads on selected web-pages

Use HTML and JavaScript to add News Feed with monetization service with RiTribes to your webpage. Configure the module and devices you want, the color you want and add a feed that allows users to get social updates on your webpage with their friends.

Embed InLine Feed with RiTribes JS in Your Webpage

Use the script and link to RiTribes hosted version of the Inline Feed with RiTribes JS framework. Ads will be monetized intelligently to reach max revenue for your website.


  1. In your Manager Dashboard, click Setting Website, then click Inline Feed.You’ll be taken to Inline Feed engagement.
  2. Click the Enable button and make sure it is ON state.
  3. Select the Module for your website.
  4. Type the section title as you want it to appear as the headline.
  5. Optional: Mark the line box and select frame color line.
  6. Select the devices you want InLine Feed to appear on.
  7. Copy the script and embed it within your website body script.
  8. Click Update to store your configuration.

Script Example

<!DOCTYPE html> 
<html> 
<body>
...
<script id="inline-feed-ritribes">
   window.inline_feed_ritribes = ({
        inline: {
                 type: "nemesis",
                },
        line: {
                display: false,
                color: "#000000",
                size: "4px",
               },
        title: {
                text: "Hot topics",
                font_family :"ReformaGroteskMediumC,sans-serif",
                font_size   : "40px",
                color: "#1d211f",
                },
        inline_wrap: { 
                      "margin-left": "-11px",
                      "margin-right": "-19px"
                    },
        item_title:{
                     "font-size": "20px",
                     "font-family" :"inherit",
                     color: "#1d211f",
                    },
        item_comment:{
                      "font-size": "14px",
                       color: "#1d211f",
                       "line-height":"20px"
                     }
       });
</script>
</body> 
</html>

Tip

A demo is available for  you to make changes and view them on real time.

Module

Here you can choose from the drop-down menu how you want the In-Line Feed structure to look.
Nemesis: Display a 100% stretch row div of the In-Line Feed with a second line underneath it that shows one Ad in the center.
Nemesis-2: Display one 100% stretch row div of the In-Line Feed with an Ad on the right.

Title

Set title description to be displayed in Inline Feed

Mode

Enabling it will make the In-Line Feed visible

Show Ad

Enabling it will make the Ad visible

Line Color

checking this box will add a line above the In-Line Feed with the color you desire from the picker on the right.
We recommend you to choose the main theme color of your website


Devices

Enable the devices you desire In-Line Feed will work in
After you’ve finished entering the settings you want on your site a generated code will appear at the bottom. Click on “Copy the code” and paste it in the desired place on your site where you want the In-Line Feed to be shown.

Onboarding New Users with Shine

With configurable logo, Shine  is designed to make RiTribes integrate seamlessly with your site, the pioneering intelligent social assistance for websites and publishers. Shine scales automatically and can be align with text labels, greeting your users and broadcasting your message to them, let them know whats interesting. You can also create personal greeting messages.

    1. In your Manager Dashboard, click Setting Website, then click Shine.You’ll be taken to Shine settings.
    2. Click the Shine enable button.
    3. Upload your logo by clicking the upload icon. Select a logo size that is clearly legible for both desktop and mobile devices.
    4. Select animations you like.
    5. Set the display timer value in seconds to set the time duration to wait until the next time the logo will appear.
    6. Set Timers, if you want to limit the the hours or days of Shine. The default is all the time to get the best results.
    7. Set the Shine display counter to limit the amount of times your logo will appear. The default is always showing your logo.
    8. Set the display timer value in seconds to set the time duration to wait until greeting them again.
    9. Type and broadcast your greeting message to your visitors
    10. Type and privately send a welcoming message to your loyal audience.
    11. Set the Text display counter to limit the amount of times the message will appear. Unlimited is checked by default, please uncheck the box it if you wish to limit the text display counter.
    12. Click Update to store your configuration.

Design standards

The file size should not exceed 200 Kb, limit the logo to 50 pixels width and length, and an image ratio of 1:1

Parameters Information

More information is available when configuring Shine using the dashboard.

Make signing in easy.

Provide a fast, secure, and privacy-friendly way for users to set up an account and start using your websites.


RiTribes API

Sign in with RiTribes is the fastest way to onboard new users securely. Sign in with RiTribes also provides two-factor authentication for private messaging. Using Sign in with RiTribes JS, you can allow users to log into your website with their RiTribes ID, rather than having to create a new account and password.

Enabling Sign in with RiTribes for your website begins with registering your site in your manager account. Choosing the user information to ask for, button presentation style, server integration, and notification options are important steps to consider when integrating the API with your website.

Examples of Use Cases

With Sign In with RiTribes, it’s easy to:

  • Allow users to create an account early in your website experience if your website has limited functionality without an account.
  • Allow users to create an account after interacting with content of your site. For example, to get notification or set up a profile.
  • Allow users to create an account after completing a purchase as a guest.
  • Allow users with existing accounts to sign in or reauthenticate to your website.
Configuring Your Webpage for Sign In with RiTribes

Use HTML and JavaScript to add Sign In with RiTribes to your webpage. Configure the authorization object and add a button that allows users to sign in to your webpage with their RiTribes ID.

Embed Sign In with RiTribes JS in Your Webpage

Use the script tag and link to RiTribes hosted version of the Sign In with RiTribes JS framework:

  
Profile Image
comments   followers   following   likes  
Configure the RiTribes Object

To get started quickly, configure Sign In with RiTribes JS with a default markup setup displayed above . Alternatively, use JavaScript to configure the object, or use a combination of the two.

You can configure the object using only markup by setting the meta tags in the header section and display a Sign In with RiTribes button.

Objects:
  • (Default) For the Sign In with RiTribes button.
  • continue. For the Continue with RiTribes button.
  • ‘ritribes-profile-rank’ Display users rank, soon to be Karma.
  • ‘ritribes-profile-image’ Display profile picture of the user.
  • ‘ritribes-profile-username’ Display user name.
  • ‘ritribes-profile-firstname’ Display users first name.
  • ‘ritribes-profile-lastname’ Display users last name.
  • ‘ritribes-profile-lastcomment’ Displays users last comment.
  • ‘ritribes-profile-logininfotext’ Displays users login social network.
  • ‘ritribes-profile-comments’ Displays users comments counter.
  • ‘ritribes-profile-following’ Displays the list of people the user is following.
  • ‘ritribes-profile-followers’ Displays the list of people who follow the user.
  • ‘ritribes-profile-likes’ Displays the amount of social interactions.
  • ‘ritribes-profile-logininfoimage’ Displays users image from his login social network.
  • ‘ritribes-profile-gender’ Displays the user gender.
  • ‘ritribes-profile-status’ Displays the status defined by the user.
  • ‘ritribes-notification-number’ (Class) Displays the user number of notifications.
Manage Your Team

Invite team members

Organizations have the option of adding additional people to their team. If you’re embedded RiTribes , you’ll manage team members in Manager Dashboard.

Required role: Admin Account


  1. In your Manager Dashboard, click Setting Website, then click Team.You’ll be taken to Users and Access.
  2. Search for the team member you want to assign a role for.
  3. Click the Add button (+).
  4. Under Roles, select the user’s role .

    Tip: To learn more about each role, click See Permissions.

  5. Click Update to store your configuration.